在表观多组学联合分析中,我们经常会遇到想对某个区域可视化,每当看到高分文章里漂亮的tracks图,就羡慕不已。今天小编就给大家介绍一款非常好用的python包—pyGenomeTracks,它能够满足Hi-C、ChIP-seq/ATAC-seq、RNA-seq和BS-seq等多种组学数据类型。接下来,就让我们一步步了解下如何实现的吧!
pyGenomeTracks的使用方法很简单易懂,首先需要生成相应的配置文件hic_track.ini(可以自己编辑也可以用make_tracks_file命令自动生成),然后用pyGenomeTracks命令对特定区域生成相应的hic_track.pdf便可。
命令如下所示:
#step1
make_tracks_file--trackFileshic_data.h5bigwig.bw-ohic_track.ini
#step2
pyGenomeTracks--trackshic_track.ini--regionchrX:2500000-3500000--outFileNamehic_track.pdf

有小伙伴马上发现,画出来的结果跟最上面展示的有些差异。这是因为很多时候我们需要对配置文件track.ini进行修改。另一方面,我们需要设计自己个性化的track,比如基因注释文件,甲基化CpGs位点还有Loops,AB
compartments等等,有时候因为数据的特殊性我们还得稍微调整下参数。因此为了画出能够直接用于文章发表的精美的tracks,还是很有必要对一些基本概念了解清楚的。
01 软件安装
pyGenomeTracks需要python >=3.6,这里小编建议用Anaconda3安装。
前几期我们有介绍如何安装Anaconda3,有需求的小伙伴可以点后面链接看看,大家按照步骤安装就可以了,Anaconda3会自动安装python3.6的。
#安装命令
conda install -c bioconda -c conda-forge pygenometracks
02 文件格式
bigwig
bed3(TAD domain),bed4(可视化peaks区域),bed6(最简单的基因格式),bed12(UCSC gene format)
arcs(Loops)
Hi-C matrices
bedgraph
epilogos
narrow peaks
按照软件说明, pyGenomeTracks可以对以上文件格式进行可视化,接下来小编对主要的几种格式进行介绍。
1
bigwig
bigwig是一种十分常用的二进制可视化格式,可以直接由bam文件生成。
小编这里没有对bedgraph格式尝试成功,大家如果也不行的话,可以转成bigwig格式再用 pyGenomeTracks画。
#bam转bigwig
bamCoverage -b in.bam --outFileName in.bw --binSize 50 --normalizeUsing RPKM --smoothLength 300 --outFileFormat bigwig
#bedgraph转bigwig
bedGraphToBigWig in.bedGraph chrom.sizes out.bw
目前,ChIP-seq、ATAC-seq和RNA-seq的信号强度都可以用bigwig文件可视化的。另外BS-seq的CpGs甲基化位点和Hi-C组学的AB compartments(PC1值)也可以生成bedgraph格式再转bigwig。
2
bed
bed格式的种类非常多,包括bed3、bed4、bed6、bed12等,它们的共同点是前3列都是chr、start、end。
第4列是名称,如果是基因我们通常用symbol名,第5列的信息一般不重要(可以都用0),第6列是基因的+-链信息。
这里我们主要介绍下bed12格式,专门用于USCS gene format可视化的。

其中translation_start,translation_end需要在TSS,TES范围内,用TSS,TES也是可以。
其实我们可以用gtf生成genePredName.txt文件,然后按照上面格式要求自己写脚本生成bed12便可。
备注
bed是0-based格式,也就是从0开始,左闭右开[ )区间,如果出现start=end的情况(如对SNP位点用bed格式可视化时),pyGenomeTracks会报错。另外我们还必须对bed文件进行sort才行。
gtfToGenePred -genePredExt -geneNameAsName2 genes.gtf genePredName.txt
sort -k 1,1 -k 2,2n test.bed > out.bed
3
Hi-C文件格式
Hi-C组学除了前面我们提到的TAD_domain.bed格式和AB compartment用bedGraph表示外,我们还有利用matrix文件画热图以及利用interaction信息画Loops。
1)loops.arcs
Loops必须采用arcs格式,如下图所示。

2)matrix.h5
matrix必须用h5格式,如果我们利用HiCPro软件得到的matrix需要转成h5格式。我们可以利用HiCExplorer软件来完成,它可以对h5,cool,hic,homer,hicpro这些格式相互转换。
hicConvertFormat -m 40000_iced.matrix --bedFileHicpro 40000_abs.bed --inputFormat hicpro --outputFormat h5 -o 40000_iced.h5
03 软件实操
1
数据准备
参考2部分准备以下文件:
file = hic_data.h5
file = domains.bed
file = bigwig.bw
file = test.arcs
file = genes_bed12.bed
生成以下配置文件test.ini
可以用make_tracks_file自动生成,之后参考以下内容修改,需要注意的是:
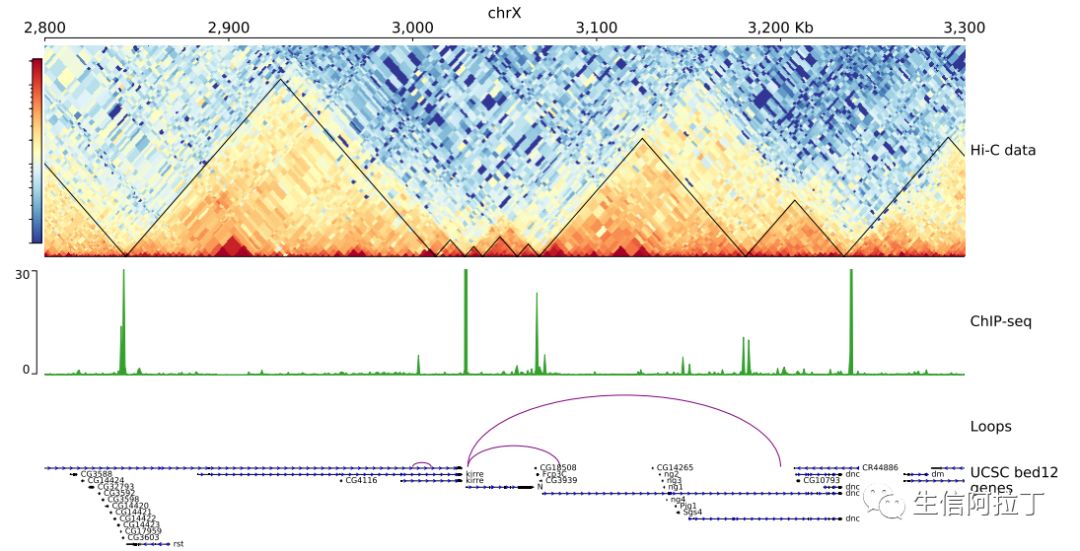
depth作为热图的高度可以调整,颜色colormap也可以为Reds。另外min_value,max_value ,transform也可以根据实际情况调整。
[x-axis]
where= top
[hic matrix]
file= hic_data.h5
title= Hi-C data
colormap= RdYlBu_r
#colormap = Reds
# depth is the maximum distance plotted in bp. In Hi-C tracks
# the height of the track is calculated based on the depth such
# that the matrix does not look deformed
depth= 200000
transform= log1p
file_type= hic_matrix
[tads]
file= domains.bed
file_type= domains
border color = black
color= none
line_width= 1.5
# the tads are overlay over the hic-matrix
# the share-y options sets the y-axis to be shared
# between the Hi-C matrix and the TADs.
overlay previous = share-y
[spacer]
[bigwig file test]
file= bigwig.bw
# height of the track in cm (optional value)
height= 4
title= ChIP-seq
min_value= 0
max_value= 30
transform= log1p
[spacer]
[test arcs]
file= test.arcs
line_width= 3
color=purple
#color = RdYlGn
title= Loops
height= 3
[test gene rows]
file= genes_bed12.bed
height= 3
title= UCSC bed12 genes
fontsize= 8
style= UCSC
gene_rows= 3
color=black
border color = black
2
生成track图
pyGenomeTracks --tracks test.ini --region chrX:2800000-3300000 --outFileName test_track.pdf
以上,就是本次分享的全部内容了,是不是很容易就能实现呢!其实小编这里主要还是起着抛砖引玉的作用,更多精美漂亮的图还等着各位小伙伴去一一尝试哦!另外该包的作者在github网址有很详细的examples。大家有兴趣的话可以去https://github.com/deeptools/pyGenomeTracks/tree/master/pygenometracks/tests/test_data下载钻研。
参考资料:
[1] https://github.com/deeptools/pyGenomeTracks
[2] https://hicexplorer.readthedocs.io/en/latest/content/installation.html